Homemade Bread in the Air Fryer: A Golden, Fluffy Masterpiece at Your Fingertips 🍞✨
Introduction
In the evolving world of culinary convenience, the air fryer has become a game-changer. Originally designed for crisping up fries and chicken wings without excess oil, this versatile kitchen tool has since expanded its repertoire. One surprising—and delicious—possibility? Baking homemade bread in the air fryer.
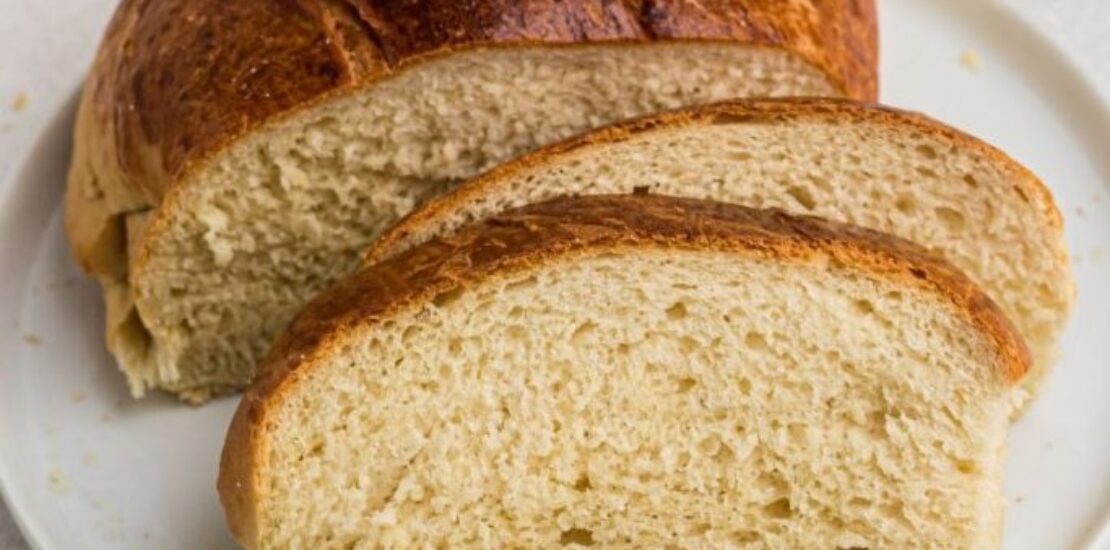
Imagine warm, golden-brown loaves with soft interiors and perfectly crisp crusts, ready in a fraction of the time it takes to use a traditional oven. Whether you’re a seasoned baker or just someone who enjoys the warm scent of freshly baked bread, this method offers a quick, efficient, and foolproof approach to making bakery-quality bread at home.
This article will guide you through:
-
The basics of air fryer baking
-
Why making homemade bread is worth it
-
A step-by-step recipe for fluffy, golden air fryer bread
-
Tips, variations, and troubleshooting for perfect results
Let’s dive into the world of fluffy insides and crispy outsides—with air fryer bread that’s guaranteed to impress.
Why Bake Bread in the Air Fryer?
You might wonder—why not just use a traditional oven? While ovens are excellent, air fryers offer distinct advantages for bread baking:
1. Speed & Efficiency
Air fryers preheat faster and bake quicker than conventional ovens. A standard oven takes 10-15 minutes just to preheat, but an air fryer is ready in about 3 minutes. Plus, smaller loaves bake in 15–20 minutes instead of 35–40.
2. Energy Saving
Because they’re compact and efficient, air fryers consume less electricity, which is great for regular bakers or eco-conscious cooks.
3. Better Crust Formation
The circulating hot air helps develop a crispy, golden crust—a feature you’d normally expect from artisan bakery bread.
4. Year-Round Comfort
Air fryers don’t heat up your kitchen like an oven does. You can enjoy baking bread in the summer without turning your home into a sauna.
The Recipe: Fluffy Homemade Bread in the Air Fryer
This simple recipe yields a soft, tender, and slightly chewy white bread with a golden crust. It’s ideal for toast, sandwiches, or enjoying warm with butter.
🧺 Ingredients
Basic Bread Dough (Makes 1 small loaf):
-
2 ½ cups (300g) all-purpose flour (or bread flour for more chew)
-
1 tablespoon sugar
-
1 teaspoon salt
-
1 packet (2 ¼ teaspoons or 7g) active dry yeast
-
¾ cup (180ml) warm water (about 110°F or 43°C)
-
2 tablespoons olive oil (or melted butter)
-
Spray oil or butter for greasing
🔪 Tools You’ll Need
-
Air fryer (basket or oven-style)
-
Mixing bowl
-
Loaf pan or cake pan that fits inside your air fryer
-
Measuring cups/spoons
-
Clean towel or plastic wrap
-
Rubber spatula or wooden spoon
👨🍳 Step-by-Step Instructions
🔹 Step 1: Activate the Yeast
In a small bowl, combine:
-
Warm water
-
Sugar
-
Yeast
Stir gently and let sit for 5–10 minutes, until bubbly and frothy. This means the yeast is activated and alive.
💡 If the mixture doesn’t foam, your yeast may be expired or the water was too hot/cold. Restart with new yeast.
🔹 Step 2: Make the Dough
In a large mixing bowl:
-
Combine flour and salt.
-
Pour in the yeast mixture and olive oil.
-
Mix with a wooden spoon or spatula until a shaggy dough forms.
Then:
-
Transfer to a floured surface.
-
Knead for about 8–10 minutes, until smooth and elastic.
💡 Alternatively, use a stand mixer with the dough hook attachment on medium speed for 5 minutes.
🔹 Step 3: First Rise (Proofing)
-
Shape the dough into a ball.
-
Place it in a greased bowl.
-
Cover with a damp towel or plastic wrap.
-
Let it rest in a warm place for 60–90 minutes, or until doubled in size.
🔁 Use your air fryer as a proofing box by preheating it at 35°C (95°F) for 2–3 minutes, then turning it off and placing the bowl inside.
🔹 Step 4: Shape the Dough
Once the dough has risen:
-
Gently punch it down to release air.
-
Shape it into a log or round, depending on your pan.
-
Place it in a greased loaf or cake pan that fits your air fryer.
Let it rise again for 30–40 minutes, covered loosely.
🔹 Step 5: Air Fry the Bread
-
Preheat your air fryer at 160°C (320°F) for 3 minutes.
-
Carefully place the pan in the basket.
-
Bake for 15–20 minutes, or until the top is golden and a skewer comes out clean.
⏱ Time may vary slightly depending on the size of your pan and air fryer model.
If the top is browning too fast but the center is undercooked:
-
Cover the loaf with foil and cook an additional 5–10 minutes.
🔹 Step 6: Cool Before Slicing
Remove the pan from the air fryer and let the bread rest for 10 minutes. Then transfer it to a wire rack and let cool completely.
🔪 Cutting bread while warm may cause it to be gummy. Wait until it’s fully cool for clean slices.
Optional Add-Ins & Variations
Customize your bread with delicious extras:
🧀 Cheesy Herb Bread
-
Add ½ cup shredded cheese and 1 tbsp mixed herbs to the dough.
🌾 Whole Wheat
-
Use 1 ½ cups whole wheat flour + 1 cup white flour.
🍯 Honey Oat Bread
-
Add 2 tbsp honey and sprinkle oats on top before baking.
🧄 Garlic & Butter Pull-Apart Rolls
-
Shape dough into small balls, dip in garlic butter, and place in a round pan. Bake like monkey bread.
Troubleshooting Common Problems
| Problem | Cause | Solution |
|---|---|---|
| Bread is dense | Under-kneaded or not enough rise time | Knead longer, give it more time to rise |
| Bread is gummy | Sliced too soon or undercooked | Let it cool fully and cook a few minutes longer |
| Bread didn’t rise | Yeast is expired or water was too hot | Use fresh yeast, warm (not hot) water |
| Top burnt, inside raw | Temperature too high | Bake at a slightly lower temperature and cover with foil halfway |
How to Store Homemade Bread
-
Room Temp: Store in an airtight bag or container for up to 3 days.
-
Fridge: Not ideal as it dries out the bread.
-
Freezer: Wrap tightly and freeze for up to 3 months. Thaw at room temp or toast from frozen.
🧊 Freeze slices individually for easy access!
Pairing Ideas
Homemade air fryer bread is incredibly versatile:
-
With butter and jam for breakfast
-
Grilled cheese sandwiches
-
As a base for garlic bread
-
Soup accompaniment (perfect with tomato or chicken noodle soup)
-
Toasted with avocado or egg
Nutritional Info (Per Slice, Based on 12 Slices)
-
Calories: ~120 kcal
-
Carbohydrates: 22g
-
Protein: 3g
-
Fat: 2g
-
Fiber: 1g
✅ Healthier than most store-bought breads due to fewer additives and no preservatives.
Conclusion
Making homemade bread in the air fryer is not only possible—it’s a delightfully easy and rewarding experience. In under 2 hours, you can go from simple pantry ingredients to a golden loaf that’s perfect for breakfast, sandwiches, or a cozy snack. With its crispy crust, fluffy interior, and customizable flavor, air fryer bread can easily become a household staple.
Whether you’re baking your very first loaf or adding a new tool to your culinary arsenal, the air fryer is your bread’s new best friend. No bulky ovens, no complicated settings—just warm, homemade bread with minimal fuss.
So next time you’re craving that satisfying smell of fresh bread, don’t wait hours. Just plug in your air fryer, gather your ingredients, and start baking the best loaf of your life—right on your countertop.